Custom Device Plugin Tutorial
This tutorial walks through a minimal but practical example of a Custom Device Plugin for fsmapper.
Using the simple_mod sample included in the Plugin SDK, you will learn how a native plugin module implements a virtual device, how that device interacts with fsmapper’s device model, and how a Lua script consumes device events and controls the device at runtime.
The focus of this tutorial is not on API reference details, but on understanding how the pieces fit together in a real plugin implementation.
What this sample demonstrates
This sample consists of two parts that work together:
- A Custom Device Plugin that emulates circular motion as a virtual device
- A Lua script that visualizes the device output and interacts with it
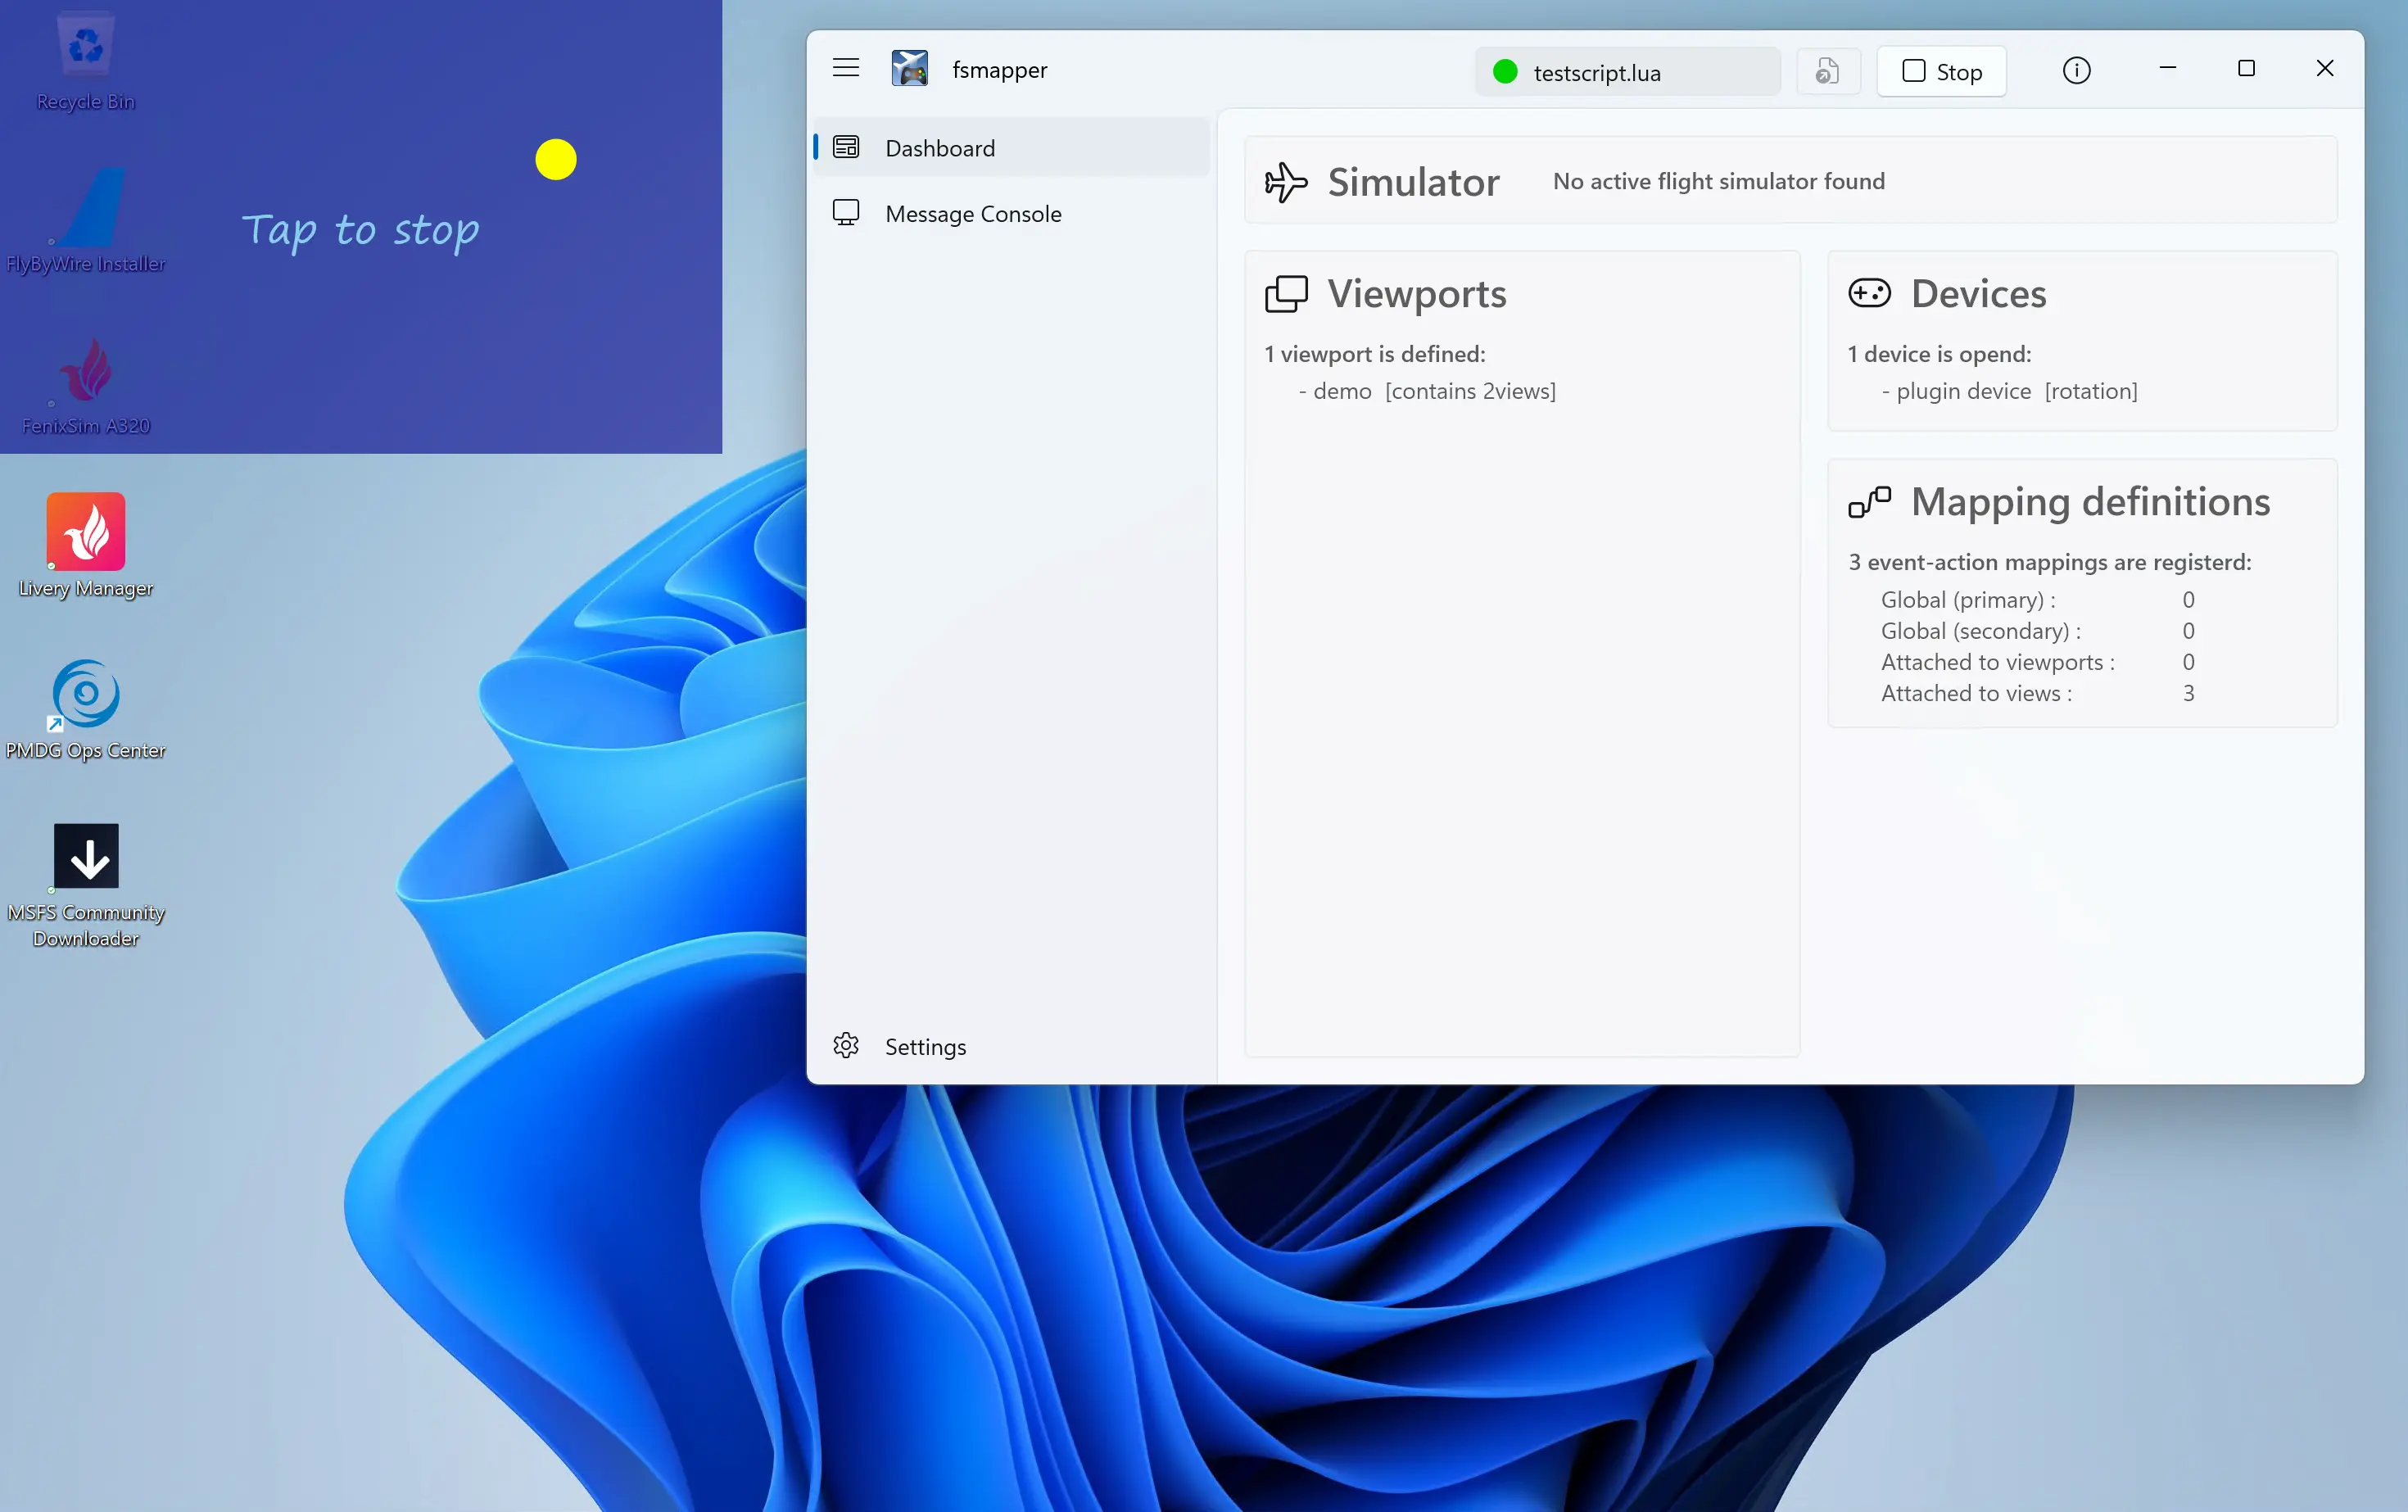
The plugin acts as a virtual device that periodically generates two-dimensional coordinates representing a point moving along a circular path. The accompanying Lua script consumes these coordinates and animates a small yellow circle moving inside a semi-transparent blue rectangular area located at the top-left of the screen.
In addition to visualizing the motion, the Lua script supports user interaction. By tapping the same semi-transparent rectangular area, the script sends control commands back to the device, allowing the rotation to change direction or stop entirely.
From the user’s point of view, this sample demonstrates:
- A virtual device that continuously produces motion-related data
- Real-time visualization of device output in Lua
- Bidirectional interaction between a Lua script and a custom device
In the sections that follow, we will explore how this behavior is implemented—from building and running the sample, to understanding the internal structure of the plugin and how it interacts with fsmapper and Lua.
The complete source code for this sample (simple_mod.cpp and testscript.lua) is included in the Plugin SDK under the samples directory.
For convenience, the same code is also available on GitHub and can be viewed directly in your browser:
How to build and run the sample
This section describes how to build the simple_mod sample plugin and run it with fsmapper.
-
Sample location
The sample is included in the fsmapper Plugin SDK under the following directory:sdk\samples\custom_devices\simple_modThis directory contains a Visual Studio solution for building the plugin, as well as a Lua script used to run and test it.
-
Build prerequisites
To build this sample on Windows, Visual Studio must be installed with the following workloads enabled:- Desktop development with C++
- Universal Windows Platform development
No additional third-party libraries are required.
-
Building the plugin
Open a Developer Command Prompt for Visual Studio, change to the sample directory, and build the solution usingmsbuild:msbuild simple_mod.sln /p:Configuration=Release /p:Platform=x64If the build succeeds, a plugin DLL
simple_mod.dllwill be generated under the build output directory (x64\Release). -
Deploying the plugin
Copy the generated DLL to one of the fsmapper plugin directories.
For example:<fsmapper installation folder>\plugins<user profile>\AppData\Roaming\fsmapper\plugins
After copying the DLL, restart fsmapper if it is already running.
-
Running the sample Lua script
Start fsmapper and execute the sample Lua script included in the same directory:
testscript.luaWhen the script runs successfully, a semi-transparent blue rectangular area will appear at the top-left of the screen, and a small yellow circle will begin moving in a circular path inside that area.
You can interact with the rectangle by tapping it to change the rotation direction or stop the motion.
Getting started with a Custom Device Plugin
Before implementing any device-specific logic, a Custom Device Plugin needs a small amount of boilerplate to integrate with fsmapper.
In practice, getting started consists of two things: including the required header file and linking against the fsmapper core library.
Required header
All Custom Device Plugins must include the Plugin SDK header provided by fsmapper.
#include <mapperplugin.h>
This header defines the Plugin ABI, runtime service functions, and data types used by fsmapper when interacting with the plugin.
Library linkage
Custom Device Plugins must be linked against fsmappercore.lib, which provides the implementation of the Plugin ABI and runtime services.
When using Visual Studio, the most common approach is to specify the library using a pragma directive:
#pragma comment(lib, "fsmappercore.lib")
Together with the header include shown above, these two lines form the minimal and typical starting point for implementing a Custom Device Plugin.
Implementing the virtual device
This sample implements its virtual device as a C++ class named device.
Each device instance owns a worker thread that periodically emits coordinate updates.
The most important point for understanding the rest of this tutorial is how the worker thread behaves:
- The worker thread is started in the
deviceconstructor - Immediately after creation, the device is in
mode::stop, so the worker thread waits on a condition variable - Once the mode is changed to
mode::cwormode::ccw, the thread wakes up and emits(x, y)updates every 50 ms viafsmapper_raiseEventfunction
The device class in this sample
The following excerpt shows the key parts of the implementation.
class device {
public:
    enum class mode{cw, ccw, stop,};

    device(FSMAPPER_HANDLE mapper, FSMDEVICE device_handle, double rpm, double side_length);
    ~device();

    void change_mode(mode dir);

private:
    std::mutex mutex;
    std::condition_variable cv;
    bool should_be_stopped{false};
    std::thread emitter;

    FSMAPPER_HANDLE mapper;
    FSMDEVICE device_handle;

    double rpm;
    double radius;
    double angle{0};
    mode direction{mode::stop};

    using clock = std::chrono::steady_clock;
    clock::time_point prev_time;
};
Worker thread
The worker thread is launched from the constructor.
However, because the initial direction is mode::stop, the thread does not emit any updates until it is explicitly started by changing the mode.
device::device(FSMAPPER_HANDLE mapper, FSMDEVICE device_handle, double rpm, double side_length)
    : mapper(mapper),
      device_handle(device_handle),
      rpm(rpm),
      radius(side_length / 2.),
      direction(mode::stop){
    emitter = std::thread([this]{
        std::unique_lock lock{mutex};
        while (true){
            if (direction == mode::stop){
                cv.wait(lock);
            }else{
                cv.wait_for(lock, std::chrono::milliseconds(50));
            }
            if (should_be_stopped){
                break;
            }

            if (direction != mode::stop){
                auto now = clock::now();
                auto dt = std::chrono::duration_cast<std::chrono::milliseconds>(now - prev_time).count() / 60000.;
                angle += (direction == mode::cw ? 1. : -1) * 2. * std::numbers::pi * this->rpm * dt;

                auto x = std::cos(angle) * radius + radius;
                auto y = std::sin(angle) * radius + radius;
                prev_time = now;

                fsmapper_raiseEvent(this->mapper, this->device_handle, unit_x, static_cast<int>(std::round(x)));
                fsmapper_raiseEvent(this->mapper, this->device_handle, unit_y, static_cast<int>(std::round(y)));
            }
        }
    });
}
When the device is running, the thread computes (x, y) coordinates for circular motion and reports them as device unit value changes:
unit_xreceives the updated X coordinateunit_yreceives the updated Y coordinate
Changing the mode
The device starts or stops emitting updates when change_mode() is called.
This method updates the current direction and wakes up the worker thread.
void device::change_mode(mode dir){
    std::lock_guard lock{mutex};
    direction = dir;
    prev_time = clock::now();
    cv.notify_all();
}
Cleanup
When a device instance is destroyed, it signals the worker thread to stop and joins it.
device::~device(){
    {
        std::lock_guard lock{mutex};
        should_be_stopped = true;
        cv.notify_all();
    }
    emitter.join();
}
In the next section, we will connect this internal implementation to the Plugin ABI callbacks, and see where device instances are created, started, controlled, and destroyed in response to Lua operations.
Defining a device at the Plugin ABI level
This section explains how the virtual device implemented in the previous section is exposed to fsmapper through the Plugin ABI.
At the ABI level, fsmapper does not see the internal device class, worker threads, or synchronization mechanisms.
Instead, it interacts with the plugin exclusively through a fixed set of callback functions.
Understanding when and why these callbacks are invoked is key to understanding how the internal device implementation is driven.
Device type and entry point
Every Custom Device Plugin must export a single entry point function named getMapperPluginDeviceOps.
fsmapper calls this function to determine whether a module is a valid plugin and to obtain all callback function pointers.
extern "C" __declspec(dllexport)
const MAPPER_PLUGIN_DEVICE_OPS *getMapperPluginDeviceOps(){
    static MAPPER_PLUGIN_DEVICE_OPS ops = {
        "rotation",
        "SDK sample device that provide rotating coordinates",
        dev_init,
        dev_term,
        dev_open,
        dev_start,
        dev_close,
        dev_get_unit_num,
        dev_get_unit_def,
        dev_send_unit_value,
    };
    return &ops;
}
The first field, "rotation", defines the device type name.
This is the string specified in Lua when creating a device instance:
mapper.device{ type = "rotation", options = { ... } }
All subsequent interactions between fsmapper and the plugin occur through the callback functions referenced by this structure.
Module-level lifecycle
Among the callbacks provided in MAPPER_PLUGIN_DEVICE_OPS, dev_init and dev_term define the lifecycle of the plugin module itself, implementing the FMSDEV_INIT and FMSDEV_TERM callbacks respectively.
static bool dev_init(FSMAPPER_HANDLE mapper){
    fsmapper_setContext(mapper, nullptr);
    return true;
}
dev_init is called once when the plugin module is loaded for a Lua script execution.
It is intended for module-scoped initialization, such as setting up shared resources.
In this sample, no module-level state is required, so the function simply returns true.
static bool dev_term(FSMAPPER_HANDLE mapper){
    device::close_all_devices();
    return true;
}
dev_term is called when the Lua script terminates and the plugin module is about to be unloaded.
Here, it acts as a final safety net, ensuring that any remaining device instances are closed even if they were not explicitly destroyed earlier.
Opening a device instance
A device instance is created when a Lua script calls mapper.device().
This results in a call to the dev_open, which implements FMSDEV_OPEN callback.
static bool dev_open(
    FSMAPPER_HANDLE mapper,
    FSMDEVICE dev_handle,
    LUAVALUE identifier,
    LUAVALUE options
){
    try{
        auto rpm = 20.;
        auto side_length = 4096.;

        auto rpm_value = luav_getItemWithKey(options, "rpm");
        if (!luav_isNull(rpm_value)){
            if (luav_getType(rpm_value) != LV_NUMBER){
                throw std::runtime_error("the value for \"rpm\" option must be numeric");
            }
            rpm = luav_asDouble(rpm_value);
        }

        auto side_length_value = luav_getItemWithKey(options, "side_length");
        if (!luav_isNull(side_length_value)){
            if (luav_getType(side_length_value) != LV_NUMBER){
                throw std::runtime_error("the value for \"side_length\" option must be numeric");
            }
            side_length = luav_asDouble(side_length_value);
        }

        auto device_id = device::create_device(mapper, dev_handle, rpm, side_length);
        fsmapper_setContextForDevice(
            mapper,
            dev_handle,
            reinterpret_cast<void*>(device_id)
        );
        return true;
    }catch (std::runtime_error& err){
        fsmapper_putLog(mapper, FSMLOG_ERROR, err.what());
        return false;
    }
}
This callback performs three important tasks:
- It interprets the
optionstable passed from Lua using Lua Value Access Helper functions - It creates a new internal
deviceinstance - It associates that instance with the
FSMDEVICEhandle usingfsmapper_setContextForDevice
At this point, the internal worker thread has already been created by the device constructor.
However, because the initial mode is mode::stop, the thread remains blocked on a condition variable and does not emit any events yet.
In this sample, the identifier parameter is intentionally ignored.
This is because the virtual device implemented here represents a single, self-contained behavior and does not need to distinguish between multiple external resources or device identities.
In more realistic plugins—such as those interfacing with physical devices or external processes—the identifier parameter is typically used to specify a device path, process name, or other identifying information. This sample keeps the model deliberately simple to focus on the interaction between fsmapper and the virtual device.
Describing device units
Immediately after a device instance is opened, fsmapper queries the device unit definitions described by FSMDEVUNITDEF.
static FSMDEVUNITDEF unit_def[] ={
    {"x", FSMDU_DIR_INPUT, FSMDU_TYPE_ABSOLUTE, std::numeric_limits<int>::max(), 0},
    {"y", FSMDU_DIR_INPUT, FSMDU_TYPE_ABSOLUTE, std::numeric_limits<int>::max(), 0},
    {"mode", FSMDU_DIR_OUTPUT, FSMDU_TYPE_ABSOLUTE, 1, -1},
};
static constexpr auto unit_x = 0;
static constexpr auto unit_y = 1;
static constexpr auto unit_mode = 2;
static const auto unit_num = sizeof(unit_def) / sizeof(unit_def[0]);
static size_t dev_get_unit_num(FSMAPPER_HANDLE, FSMDEVICE){
    return unit_num;
}
static bool dev_get_unit_def(
    FSMAPPER_HANDLE mapper,
    FSMDEVICE,
    size_t index,
    FSMDEVUNITDEF *def
){
    if (index < unit_num){
        *def = unit_def[index];
        return true;
    }else{
        fsmapper_putLog(mapper, FSMLOG_ERROR, "invalid unit id");
        return false;
    }
}
These callbacks, implementing FMSDEV_GET_UNIT_NUM and FMSDEV_GET_UNIT_DEF respectively, describe the device interface—its input and output units—from fsmapper’s point of view.
Notably, the internal device context is not accessed here. This is intentional: device unit definitions are fixed for the device type and do not depend on per-instance state. As a result, unit definitions can be queried safely before the device is started.
Starting device operation
Once the device interface has been established, fsmapper instructs the plugin to start device operation by invoking dev_start.
static bool dev_start(FSMAPPER_HANDLE mapper, FSMDEVICE dev_handle){
    auto device_id = reinterpret_cast<uint64_t>(
        fsmapper_getContextForDevice(mapper, dev_handle)
    );
    auto&& object = device::id_to_device(device_id);
    object.change_mode(device::mode::cw);
    return true;
}
This callback marks the boundary where the device is allowed to begin emitting asynchronous updates.
In this sample, calling change_mode(mode::cw) transitions the worker thread from its waiting state into active operation.
From this point onward, the device periodically reports updated X and Y coordinates to fsmapper.
Receiving commands from fsmapper
When a Lua script sends a value to an output device unit, fsmapper invokes dev_send_unit_value, which implements FMSDEV_SEND_UNIT_VALUE callback.
static bool dev_send_unit_value(
    FSMAPPER_HANDLE mapper,
    FSMDEVICE dev_handle,
    size_t index,
    int value
){
    if (index == unit_mode){
        auto device_id = reinterpret_cast<uint64_t>(
            fsmapper_getContextForDevice(mapper, dev_handle)
        );
        auto&& object = device::id_to_device(device_id);
        object.change_mode(
            value == 0 ? device::mode::stop :
            value > 0 ? device::mode::cw :
                        device::mode::ccw
        );
        return true;
    }else{
        fsmapper_putLog(mapper, FSMLOG_ERROR, "invalid unit id");
        return false;
    }
}
This callback completes the bidirectional interaction model:
- The device emits coordinate updates as input units
- Lua scripts send control commands back to the device via an output unit
Closing a device instance
Finally, when a device instance is closed—either explicitly or via garbage collection—fsmapper invokes dev_close, which implements FMSDEV_CLOSE callback.
static bool dev_close(FSMAPPER_HANDLE mapper, FSMDEVICE dev_handle){
    auto device_id = reinterpret_cast<uint64_t>(
        fsmapper_getContextForDevice(mapper, dev_handle)
    );
    device::close_device(device_id);
    return true;
}
This removes the internal device instance.
The worker thread is terminated as part of the device destructor, ensuring that all background activity is cleanly stopped.
Interacting with the device from Lua
This section highlights the key interaction points between the Lua script (testscript.lua) and the Custom Device Plugin.
Rather than explaining the entire script line by line, it focuses on how fsmapper concepts—devices, events, views, and actions—are used together in this sample.
Opening the plugin device
The Lua script creates a device instance by calling mapper.device().
The type parameter must match the device type name provided by the plugin ("rotation" in this sample).
local device = mapper.device{
    name = "plugin device",
    type = "rotation",
    identifier = {},
    options = {rpm=20, side_length=m_radius * 2},
}
The options table is passed directly to the plugin’s dev_open callback, where it is interpreted using Lua Value Access Helper functions.
In this sample, rpm and side_length control the speed and size of the circular motion.
The identifier parameter is present for completeness but is not used in this sample, as the virtual device does not need to distinguish between multiple external resources.
Receiving device output as events
After opening the device, the script retrieves event IDs for each device unit.
local dev_events = device:get_events()
The plugin defines device units named x and y.
When the plugin reports a value change for these units, fsmapper raises corresponding events that can be handled in Lua as:
dev_events.x.changedev_events.y.change
These events carry the updated coordinate values produced by the virtual device.
Visualizing device output with a canvas
A canvas view element is used to visualize the (x, y) coordinates generated by the device.
local canvas = mapper.view_elements.canvas{
    logical_width = canvas_size,
    logical_height = canvas_size,
    value = {0, 0},
    renderer = function (ctx, value)
        ctx.brush = circle_color;
        ctx:fill_geometry{
            geometry = circle,
            x = value[1], y = value[2],
        }
        ctx.font = message_font
        ctx.brush = message_color
        ctx:draw_string{
            string = messages[(is_moving - 1) * direction +2],
            x = 0, y =0,
            width = canvas_size, height = canvas_size,
            horizontal_alignment = 'center',
            vertical_alignment = 'center',
        }
    end
}
The canvas renderer reads the current value and draws a small circle at that position.
Updating canvas.value from an event handler automatically updates the visualization.
Handling device events in mappings
The connection between device events and the canvas is defined using event-action mappings for the view.
{event=dev_events.x.change, action=function (evid, value)
    point[1] = value
    canvas.value = point
end},
{event=dev_events.y.change, action=function (evid, value)
    point[2] = value
    canvas.value = point
end},
Each time the device reports a new X or Y coordinate, the corresponding event updates the canvas position. This illustrates fsmapper’s event-driven model: device state changes flow through events into Lua actions.
Sending commands back to the device
The script also sends control commands back to the device using an output unit.
local dev_upstreams = device:get_upstream_ids()
When the user taps the OperableArea, the script computes a new mode value and sends it to the device using Device:send():
{event=tap, action=function ()
    if is_moving == 1 then
        is_moving = 0
    else
        is_moving = 1
        direction = direction * -1
    end
    canvas:refresh()
    device:send(dev_upstreams.mode, direction * is_moving)
end},
This value is delivered to the plugin via the dev_send_unit_value callback, where it is interpreted as a command to start, stop, or reverse the rotation direction.
Summary
From the Lua script’s perspective, the Custom Device Plugin behaves like any other fsmapper device:
- Device output is received as events
- Device behavior is controlled by sending values to output units
- Views and mappings connect events to visualization and user interaction
This separation allows the device logic to remain in the plugin, while Lua focuses on event handling and presentation.
Next steps
In this tutorial, you saw how a Custom Device Plugin is implemented, exposed to fsmapper through the Plugin ABI, and used from a Lua script in an event-driven way.
From here, you can explore the Plugin SDK Reference to learn more about:
- The complete Plugin ABI and callback semantics
- Runtime services provided by fsmapper
- Advanced device unit definitions and event handling patterns
These references provide the detailed specifications needed to build your own custom devices beyond this sample.